You can build a complete fire pit seating area for four to six people using $280 in materials from a big box store. The design uses a 36-inch steel ring, gravel base, concrete paver perimeter, and cinder block benches topped with 2x10 lumber. Total build time: one weekend.
What You Need
| Material | Quantity | Cost | Notes |
|---|---|---|---|
| 36" steel fire ring | 1 | $45 | Tractor Supply or Rural King |
| Pea gravel (0.5 cu yd) | 1 bag | $35 | For base drainage |
| Concrete pavers 12x12" | 40 | $60 | $1.50 each at Home Depot |
| Cinder blocks 8x8x16" | 24 | $48 | $2 each, standard gray |
| Pressure-treated 2x10x8' | 3 | $42 | Bench tops, cut to 6’ lengths |
| Landscape fabric 3x50' | 1 roll | $18 | Weed barrier |
| Crushed stone (0.5 cu yd) | 1 bag | $32 | Fire pit interior fill |
| Total | $280 |
You also need: shovel, rake, level, work gloves, measuring tape, circular saw (for cutting bench boards).
How to Do It
Step 1: Mark a 12-foot diameter circle using a stake and string. This gives you a 36-inch fire pit center with 4.5 feet of clearance on all sides.
Step 2: Remove grass and soil to 4 inches deep across the entire circle. Rake the bottom flat.
Step 3: Lay landscape fabric over the excavated area. Overlap seams by 6 inches.
Step 4: Spread 2 inches of pea gravel over the fabric. Rake level. This drainage layer prevents water pooling under the fire ring.
Step 5: Place the steel fire ring in the center. Fill the interior with crushed stone to within 2 inches of the top edge. This creates a stable base and improves drainage.
Step 6: Lay concrete pavers in a ring 18 inches out from the fire ring edge. You need about 40 pavers for a complete circle. Set them directly on the gravel, tap level with a rubber mallet. Leave 0.5-inch gaps between pavers.
Quick Tip: Rent a plate compactor for $40/day if your soil is sandy or loose. Compact the gravel base before setting pavers. Skipping this step means pavers sink within a year.
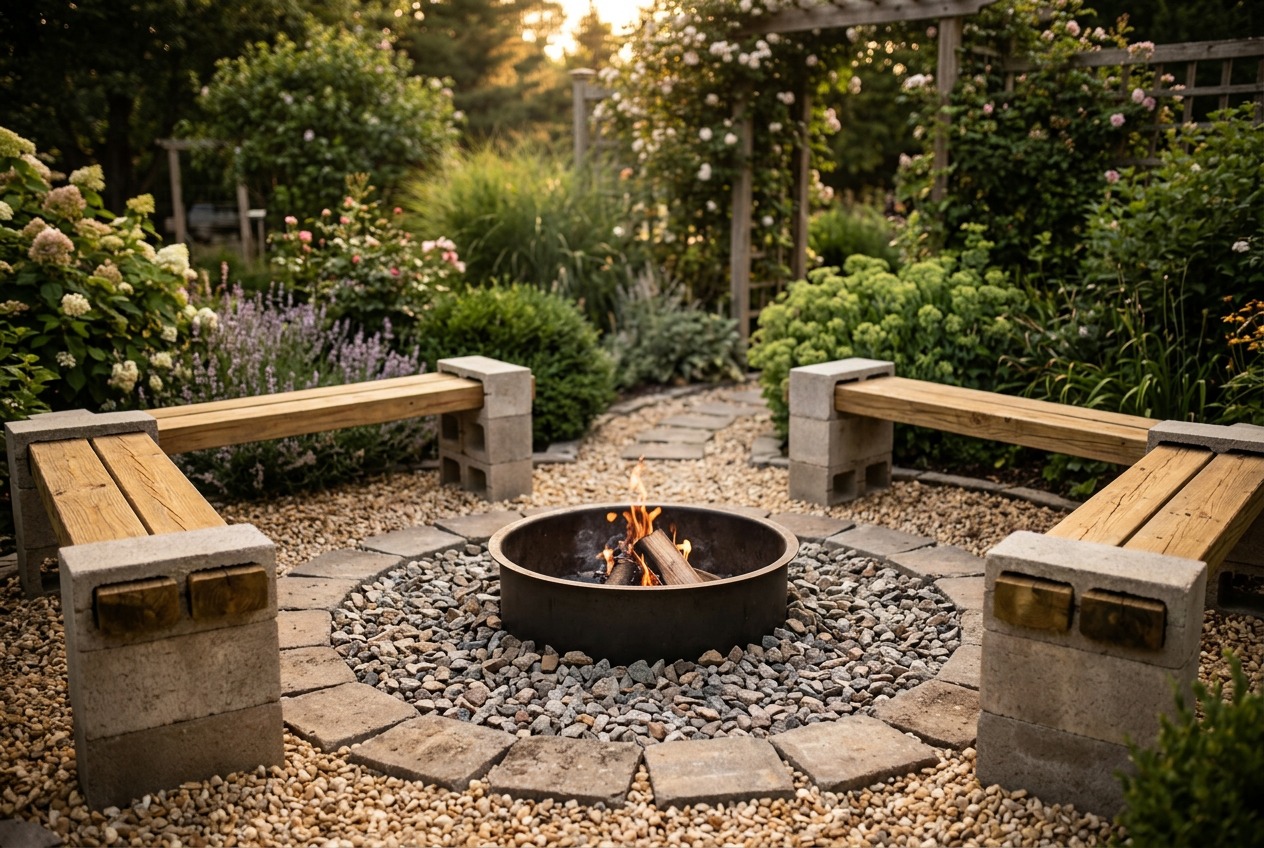
Step 7: Build two L-shaped benches using cinder blocks. Each bench uses 12 blocks: stack two blocks high, three blocks per side. Position benches 6 feet apart, facing the fire pit.
Step 8: Cut pressure-treated 2x10 boards to 6-foot lengths. Lay one board across the top of each cinder block bench. No fasteners needed. The weight holds them in place.
What to Watch For
The fire ring must sit on gravel, not pavers. Direct heat cracks concrete. Keep the ring 2 inches above the paver level.
Cinder blocks absorb moisture. In freeze-thaw climates (Zone 6 and colder), fill the hollow cores with sand before winter. This prevents cracking. I skipped this the first year and replaced four blocks the next spring.
Pressure-treated lumber needs six months to dry before staining. The boards will warp slightly as they cure. Flip them monthly during the first season to minimize cupping.
Make It Your Own
Curved bench layout: Instead of two L-shaped benches, build one continuous curved bench using 18 cinder blocks. Stack them in a gentle arc 6 feet from the fire ring. Top with three 6-foot 2x10 boards laid end to end.
Gravel vs. pavers: Skip the concrete pavers and extend the pea gravel to the full 12-foot circle. Saves $60. Less formal look, easier to adjust layout later.
Built-in planters: Leave gaps in the cinder block stacks. Drop 12-inch nursery pots into the openings. Plant trailing rosemary (Rosmarinus officinalis, Zones 7-10) or creeping thyme (Thymus serpyllum, Zones 4-9) for mosquito-repelling greenery.
Zone-specific seating plants: In Zone 5-6, plant lavender (Lavandula angustifolia ‘Munstead’) in pots behind the benches. In Zone 8-9, use lemongrass (Cymbopogon citratus) in 5-gallon buckets. Both repel insects and smell good when brushed against.
From my experience: I built this exact setup in spring 2024 for $275. The cinder block benches are rock-solid. The only mistake was using untreated 2x6 boards instead of pressure-treated 2x10s. They warped badly by July. Replacing them with PT lumber added $42 but solved the problem permanently.
Before You Start
Check local fire codes. Most municipalities require fire pits to sit 10-25 feet from structures. Call your city’s building department before digging.
This project works best on level ground. If your yard slopes more than 6 inches across 12 feet, you need retaining blocks on the downhill side. That adds $60-80 to the budget.
Spring and fall are ideal build seasons. Avoid summer if your area gets above 90°F. Digging in heat is miserable. Avoid winter if your ground freezes. You can’t excavate frozen soil without a jackhammer.
The 36-inch fire ring is the largest size that works for a $300 budget. Bigger rings cost $80-120 and require more gravel and pavers.
FAQ
How long does it take to build this fire pit area?
Six to eight hours of work split across two days. Day one: excavate, lay fabric and gravel, set the fire ring. Day two: place pavers, build benches, cut and position seat boards. Add two hours if you need to move soil or level the site first.
Can I use regular lumber instead of pressure-treated for the benches?
No. Untreated pine or fir will rot within 18 months from ground moisture and rain. Cedar or redwood work but cost $80-100 per board. Pressure-treated 2x10s last 10-15 years outdoors and fit the budget.
What if I don’t have access to a truck for materials?
Home Depot and Lowe’s rent trucks for $19/75 minutes. One trip hauls everything except the gravel and crushed stone. Get those delivered for $50-75. Total cost stays under $300 if you skip the paver ring and use gravel only.
Do I need to seal or finish the wood bench tops?
Not immediately. Let pressure-treated lumber weather for six months before applying any finish. After that, use a clear water repellent (Thompson’s WaterSeal costs $15/gallon, covers all three boards). Reapply every two years. Skipping this step is fine. The wood turns gray but stays structurally sound.